Showing posts with label DIY Builds. Show all posts

Tuesday, January 17, 2012

DIY Laundry Giclee Inspired by Ballard Designs

Hi guys..long time no blog..sorry! Things have gotten pretty hectic with the beginning of the new year and also admittedly, the commencement of my Pinterest account :/ Me, distracted? Not at all! 
Well, putting Pinterest aside, here I am with another fun (the fun is actually subjective in this case, you'll see why) DIY decor idea for you :D 
The picture above from Ballard Designs is pretty much anyone's dream laundry room, right?? I say yes. I have been eyeing this beautiful laundry giclee for about a year and a half...deciding how I could justify $129 piece of beautiful art in my laundry room. Mr. P decided for me, it could not be justified. LOL. So when my friend Debbie told me she also loved the giclee, and owned a Cricut Expression...the idea seemed like an exciting new possibility ;) 
Being only $35 for a set of three, I thought these rustic safety pins were a much better deal. Instead of being patient and waiting for them to adorn my laundry room..I slapped these large lovlies above our TV nook and I thought they were a great fit. So there they will stay. Ginormous rustic safety pins don't have to be doomed to the laundry room, right? I don't think so either!
Debbie and I took a field trip to Hobby Lobby. Since Panera Bread was in the same shopping center, we were also forced to have an amazing lunch. Yes, it was a hard day indeed! 
So for this project, we each purchased a roll of Vinyl and a blank 24''x 36'' canvas. (The size of the Ballard canvas is a square 24'' x 24'' canvas which we could not find. Its possible they might be sold at Michaels or Aaron Brothers if you would prefer your giclee looks truer to the real thing. I figured the other size would work just as well for me).
The roll of Vinyl was $7 and the canvas was on sale for $8.50. Look out for a 40% off coupon to make this an even better deal.
Debbie was so kind as to cut all my letters for me. The large font for the first row was 4'' and the rest of the letters were 2''. I measured out the very fist line allowing 5 inches of space. Then a 1 inch spacer. Then 2 inches of space for my 2 inch letters. It turned out the the tall letters (such as k and h) were the only ones that actually measured a full 2 inches. So I revised my measurements to 2 inch spaces for letters and 1/2 inch for the spaces in between the letters.
After I had pencilled in all my measurements (there was a lot of trial and error going on!) I finally was able to sort out all my vinyl letter cut outs. To make the process easier, they were put into alphabetical order in coordinating piles. Punctuation marks and capital letters were separated. I got out my laptop and pulled up the Ballard Design photo as a reference. Next comes the tedious part (this took a little less than 3 hours).
Stick all your letters on in the order they go in. I ended up spacing my letters a little too far apart and instead of taking all my letters out and starting over, I just cut out a few words that weren't crucial to the definition. Yes, I'm such a cheater :P
I chose a satin spray paint from Home Depot. The color was Nutmeg. Debbie used an acrylic craft paint, the end results on both turned out pretty similar in my opinion. With the acrylic paint, the letters did bleed a bit underneath the vinyl but I actually thought it gave the sign a really awesome old printing press style, stamped look. Using the spray paint I also had some bleeding. When I took my sign outside to spray, it was VERY windy. A few of letters started to lift off. I ran into the garage with my sign so as to protect my letters and began to spray. I accidentally sprayed the wall. Shoot! Back outside :( 
The letters lifting ended up causing me some paint bleeding. Which is ok if you like that vintage stamped look...but it can also cause in-uniformity because some letters will be clean cut and others will have bleeding. In the end, that did happen to me but it really didn't look as bad as I thought and it made my sign look really unique.

Let your paint dry then begin to peel off your vinyl. Watch out for those pesky little periods, and dotted i's. 
I was able to correct some of the major bleeding spots with a Q-Tip and nail polish remover. It did do the trick, but be VERY careful because a few slip ups with make it look terrible! You also have the option of doing touch ups with white paint.
Here is my end result! For about $21 bucks I am totally happy. (It's not up in my laundry room yet because I need a shelf and a few accessories to complete my look. I plan to hang this sign over the washer, and a reclaimed barn wood shelf over the dryer. On the shelf will be some old tins, and mason jars filled with wooden clothes pins and rusty safety pins). The wind REALLY worked against me though and I came out with some bleeding in a few areas and some patches where my paint was heavier than others where the wind blew :( If you attempt this project, make sure the weather is nice and your letters are pressed on nice and tight and you should be fine. I will warn you, unless you absolutely love crafting and DIY, this project will probably make you want to kill yourself before it's over. It certainly can't be done in a day unless you have no kids and plan on not eating or showering. Unless you stay up half the night finishing. You really have to WANT to save a buck to complete this project. This project saved me about $110 plus tax and shipping which was awesome. It's up to you to decide if the savings is worth the work. 
So all in all, I'm really happy I have this sign for my laundry room! There was plenty of trial and error, corrections, tedious work, mistakes and messes made along the way. But unless an employee from Ballard Designs visits my laundry room...I don't think anyone will know the difference ;) 
Happy Crafting! 


Wednesday, December 28, 2011

Adorable Yarn Pom Pom Flowers

When I saw these lovely handmade flowers on Aestheticnest.com I thought they looked perfect...like some kind of a retro, vintage-y marigold. I loved the rich saffron color as well. Bottom line: I HAD to figure out how to replicate these! 
I decided my sister's baby shower in a few weeks would be a good reason to make these...so I chose the colors chocolate and ruby. (Tip: I made the mistake of buying really chunky yarn for the brown flowers, thinking I would like it better. Well...long story short I think the end result looks best with very thin yarn)
The first step is to wrap the yarn around your four fingers no less than 100 times. Seriously. 
After you have wrapped the yarn around your hand (anywhere from 100-120 times, depending on the fullness you desire) slide the yarn off your fingers so as to maintain the shape of the bunch. Then take a cut piece of yarn at least 6 inches long, slide one side through the middle of the circle and tie it all together as tight as you can, making at least a double knot. 
Hold the bunch in your hand, holding your thumb over the piece of thread that you just used to tie the double knot. Then take GOOD, sharp scissors (you will regret if you don't follow that step! ;) and cut down the middle of the loop, creating a shaggy pom pom.
Hold your pom pom over the trash can or an area where sweeping and clean up will be easy. Start cutting your pom pom, shaping it into a neat circle and creating the size that you want it to be.
Ok sorry for the yucky trash can shot...hehe...and my purple P.J.'s. But you can see how I am shaping my pom pom...this actually took A LOT more cutting than I expected :/ This is where you will be glad you brought out the nice, sharp scissors! I actually blistered my thumb with my old scissors. Not good. 
After you have your desired shape and size all cut out, then will be the time to fluff out the pom pom a bit. Do this until it is to your liking. I wanted mine to be a bit more fuzzy....but if you want a clean cut look then skip this step completely.
Here is one of my favorite parts because I am the hot glue QUEEN! LOL! It's instant gratification :D I will hot glue anything, and call me weird but I love the smell too! Open your pom pom until the center is exposed a bit, dab a bit of hot glue and fasten it to a twig from your yard, a popsicle stick, craft wood, a piece of rusty wire...or whatever you think will best achieve the look you want. Hold the pom pom tightly onto your 'stem' until the glue dries and..presto! You've got an adorable, budget friendly vase or mason jar filler :D 
I must say the shadow on my wall is giving the illusion that my flowers are a bit bigger than they actually are, and like I said before, I think thin yarn is the way to go :) When I do my ruby colored flowers with thin yarn..I will post pictures of the difference. But the directions I provided will give you the basis on how to make the flower, and you cut and shape them however YOU like!  
Have fun!


Saturday, December 10, 2011

The All Natural Christmas Tree

I love Christmas, and Im pretty particular about my decorations...only because I've been fighting eager little hands for the last 4 years (and it felt like every year we added a new set of hands!) to guard and protect my Christmas tree from them and vice versa. Some of the most attractive things to a baby or toddler are twinkle lights, shiny tinsel, and glittering ornaments and all those Christmasy things that dangle and entice them. This year I wanted things to go differently. No mess, no missing keepsakes, no broken ornaments, no babies unplugging lights, and no threat of an 8 foot tree falling onto my kid. I am so excited to share these ideas with you! 
I started with a small tree (I got mine at Home Depot for $19, which is quite a savings compared to the $55 we usually pay for a full size tree) and potted the tree with something I had laying around the garage. (You can use anything that will support the weight of your tree, get creative). Solution #1, I saved money. Solution #2, tree is on my formal table out of reach from curious hands. Solution #3, I still have a living tree that smells like Christmas :)
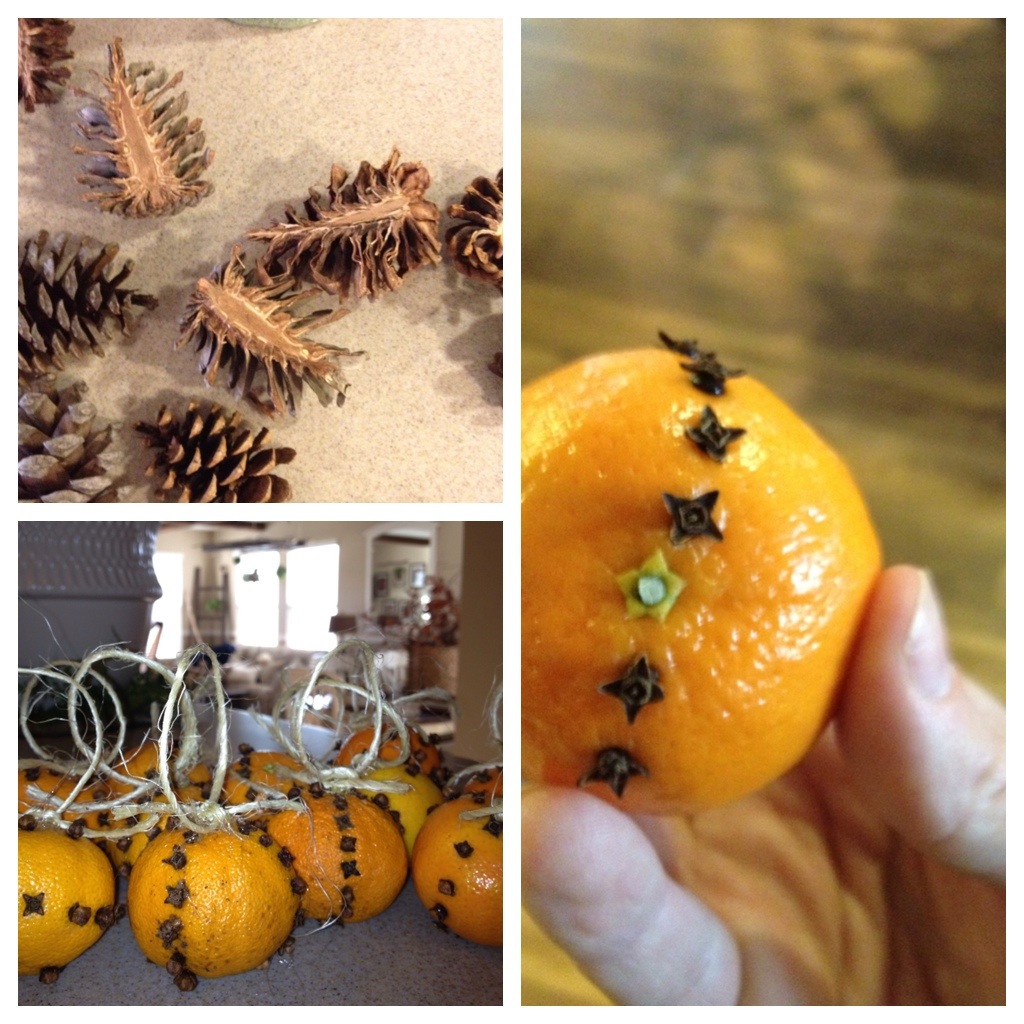
 Here's the fun part. Choose natural ornaments to adorn your tree. These will most likely be home made, saving you even more money! And if the kids DO get ahold of one of these, there will be no shattered glass, electric parts, or toxic things they can put in their mouths. For these lovely little orange ornaments I took California Clementine Cutie fruits (traditional oranges are too heavy) and pushed whole cloves (.99 a bag at any grocery store) into them in a pattern then hot glued on a twine loop. Helping insert the cloves was so fun for the kids as well. And I cannot describe how wonderful these smell...after Christmas they would make the most amazing fillers for a potpourri bowl or glass vase! Also pictured, you could hang plain pine cones from your yard or cinnamon ones to compliment the amazing smell of your clove oranges :) 
 Another cheap and natural ornament idea is sliced, dehydrated citrus fruits. Slice, and bake directly onto your oven rack. Punch a hole after they've baked and string with twine...BAM! A totally unique ornament! 
This one is great because you can go to your local Home Depot or Christmas tree farm and get the Christmas tree stump scraps for free. They are usually found in a big discard bin near the purchase area. And heres what you do...
Decorate them with newspaper cuttings, scrap book paper, or whatever your little heart desires! Have the kids help for a fun Christmas craft :D 
Acorns with holes drilled thru and strung are free, simplistic and naturally beautiful. Or...
Or dress them up with felt and and twine and you've got yourself some all natural garland!
 If you love burlap like I do, you could create some of these little lovelies as a natural ornament...and burlap is SO cheap and versatile. Check your local hardware store. You can also use burlap as a primitive tree skirt! 
You could also hang small cinnamon bundles for your tree....
OR make them into a star as your new, all natural tree topper!
I hope you enjoyed some of these ideas. I love the fact that they are cheap, household items or stuff you could find on a nature walk. get creative with bringing the outdoors in. The smells and colors are so beautiful and it will compliment your tree and home decor in the most amazing way. Best of all, all of these things are safe around your littlest loved ones (and pets!) 
Merry CHRISTmas! :D